Fanacasecul is the first Ayleid ruin one encounters when heading southeast from the Imperial City on the Red Ring Road. It is also notable as the first ruin conquered by the original adventuring party.
Exterior[]
At the time of the party's raid, there was one bandit and a dog outside the ruin. Additionally, there were two locked (but easily picked) Ayleid coffers outside, both lined with gold. One contained a small cache of jewelry, and the other a pile of bonemeal, which signified the presence of necromancers.
The exact reason the bandit and his dog were present around the ruins is unknown. It is possible he was hired by the necromancers within the ruins to alert them incase anyone approached with intent to raid Fanacasecul, though it is equally likely that he was just treasure hunting or was making camp in the ruins, and had no idea that necromancers were present inside the ruin.
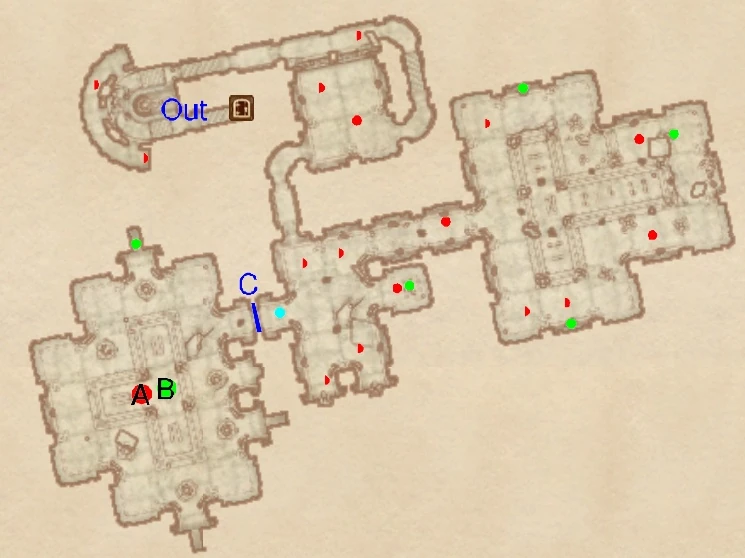
Entrance Corridor[]
This location is the inverted-U section marked "Out" on the map. It consists of a short stone corridor which collapses partway into a shallow depression. The corridor becomes a roughly hewn ridge continuing around the depression on the far side, then descends into a stone staircase. There are a handful of Welkynd stones at the bottom of the depression. Two skeletons are hiding behind crumbling pillars on the ridge, marked by red dots on the map; there is an additional skeleton after the staircase at the end of the corridor.
Antechamber[]
This location is the square-shaped section which the post-staircase entrance corridor opens into. There is nothing of particular note inside, apart from two wandering skeletons. The corridor continues at the opposite end of the antechamber, making an immediate left turn down into the next location.
Junction[]
This location is the small rectangular section between the blue gate (left) and the corridor into the Ayleid hall (right). There is less light here and a decidedly misty atmosphere. Four skeletons patrol through this area along with a randomly wandering wraith, which may show up here or in the Ayleid hall. The small annex on the right side of the room contains an Ayleid coffer and a necromancer, who is hiding behind some sort of invisibility spell and commanding the undead. He will not attack you directly until you have destroyed some or all of the skeletons present.
Ayleid Hall[]
This location is the large inverted-T section to the right of the junction. There is a raised dais filling the centre of the hall; it is the same shape as the hall and about half its size. The hall contains three patrolling skeletons, two ghosts, and a randomly wandering wraith, which may show up here or in the junction. There are Ayleid coffers in the small recessed alcoves left and right of the top of the dais, and another partially buried in rubble to the left of the end of the dais.
Boss Chamber[]
This location is the large section to the left of the junction, behind the blue gate. The gate is opened by stepping on a pressure pad (marked in teal on the map). However, this also alerts the other necromancers that someone is there. There are two necromancers inside the chamber, a female Dunmer and a male Imperial; they will conjure random undead as soon as they are aware of you. The final Ayleid coffer is in the recessed alcove at the top of the chamber.
Live Map[]
There will be a live map here, as soon as I figure out how to make one.